|
|
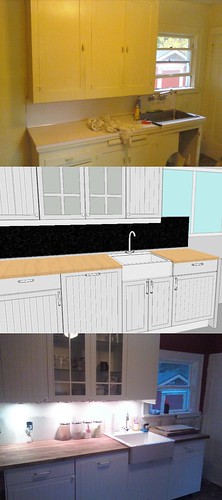
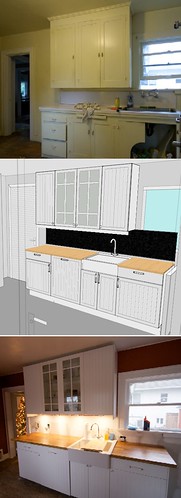
Last night, we finished the last major portion of our kitchen cabinet install. The highlights:
- 0. Design and Buy: We spent months measuring and using IKEA's handy kitchen planner. Our kitchen is a good size room, but every corner has a door or window which prevented designing a L-shaped layout. So, we settled on keeping the kitchen's original layout -- although we have moved the fridge to another wall against a window.
Our original $600 plan ended-up becoming $2,800 plan. We had considered IKEA's VARDE free-standing kitchens which seemed easier, but the sizes didn't work out and had fewer options than the typical AKURUM built-in kitchen we selected. IKEA had a kitchen sale which compelled us to also order the microwave and cabinets for above the fridge/stove wall too. The IKEA Kitchen Planner totaled $2,500, but after the IKEA rep added all the little extras our plan was missing, we were closer to $2,900 before the discount.
Unfortunately the day we ordered the cabinets, I also dislocated my knee cap, so the project was basically delayed a month while I was on crutches. - 1. Wall Cabinets: We liked the original old wall cabinets and considered keeping them because they were very large. However, the original cabinets were too tall and would have left us with one foot of clearance above any new base cabinets. Like most original carpentry in our house, we discover the cabinet was merely held in with nails so it was just a matter of pulling them down.
The new cabinets are IKEA AKURUM with STAT White front. We wanted glass doors to match the original hutch on the other wall and considered having all four doors glass, but one of our final design decisions was to change the end doors to solid to hide the contents.
Our only regret is installing the wall cabinets before installing the lighting and top molding. IKEA seems to assume wall cabinets will not be installed near the ceiling. We still need to ponder how we will install the lighting and top molding. I have a plan that involves my sister's petite arms. - 2. Base Cabinets Removal: The scariest decision was removing the original cabinets and sink because that was a point of no return. From our prior glimpses under the cabinets, we knew there was missing underlayment beneath the cabinets. Our first carpentry task was installing a 3x5-foot section of underlayment. It was pretty easy. Well, admittedly we had Home Depot cut the board to size, but still it seemed like a major task considering I haven't taking wood shop since 10th grade.
- 3. Plumbing, Electrical, and Drywall: Originally, we thought we would be without a sink for a week while the plumbing and electrical were installed. Well, moving plumbing connections a couple of feet and installing a couple of outlets was a major project that took weeks to finish -- delayed in part due to Christmas. Instead of just patching a couple of holes, the entire bottom half of the lath and plaster wall had to be replaced which we had not anticipated. We insulated the exterior portion of the wall to protect the plumbing and eventually figured out how to install the wallboard. While our first wall installation is less than perfect, most of it will be covered by the cabinets and eventually tile backer board.
- 4. Base Cabinets, Sink, Counter Top, and Dishwasher: The base cabinet assembling was as easy as the IKEA instructions stated. The only trick was figuring out that the DOMSJO sink also included the hardware for the base cabinet.
We chose the NUMERAR oak countertops because they were relatively cheap and would match the oak floors in the rest of the house. The biggest challenge was figuring out how to cut the counter top which was delivered in one long piece. Fortunately the DOMSJO sink only requires a straight end cut, so we didn't have to cut a sink hole. My error was not supporting the counter top while cutting. The piece twisted and split at one corner, so we had to rotate the bad edge against the wall. Also not mentioned in the IKEA instructions and not obvious when first unpacking was that the counter top does have a top and bottom side as the bottom side is stamped at one corner. I also discovered that it is well worth buying a high quality circular saw blade instead of using the one that came with the saw.
What we didn't realize with the NUMERAR counter top is that we now need to oil it daily FOR THE REST OF OUR LIVES. - 5. TOE KICK, TOP MOLDING, AND TWEAKS: We still have to install the toe kick and top molding. We also need to adjust one of the base cabinet doors and see if we can fit the dishwasher closer into the cabinet.
FIRST DRAFT
8 comments:
We saw these cabinets today and my husband loves them! Thank you for your blog.
Thanks for the comment! We have enjoyed the cabinets. The base cabinets with the pull-out baskets have been great in dealing with our numerous pots and pans.
Looks good! Found your blog while searching for info on Akurum toe-kicks. Have you put yours on, yet? Specifically I was wondering if you have to use theirs or if there is a way to mod other moldings to work. Did you or your contractor have to do any special bracing for the sink? The guy at Seattle Ikea indicated this will be a pain and kind of talked me out of it. Also- re: oiling the counter- I have googled how to treat the surface and found many blogs and articles in which numerous people who have had butcher block and/or Ikea wood counters found the best surface treatment is mineral oil mixed with melted beeswax- you basically heat the two together in a glass jar set into a water bath on low on the stove until it is liquid, and after a couple of daily applications, it can be done much less often- like every month or less. It sounds like the main area of concern is around the sink with splashing, etc, and the beeswax in particular makes a barrier against the water.
Hi Melissa,
Ugh. You caught me. We haven't put the toe kicks in yet. We decided not to bother installing them yet because we're planning on tiling the floor (some day). It seems any similarly-sized molding could be screwed to the mounting brackets.
I don't recall having any problems installing our DOMSJO sink. The Portland IKEA rep. also mentioned something to us about additional bracing since we were installing the sink next to a dishwasher. He had us order an additional side panel, but I never figured out what to do with it. Instead, I screwed a 2x4 to the wall in the dishwasher space. As suggested in the installation video, we screwed a long 2x4 to the wall for the rear of the base cabinets to sit on which seems more secure than the plastic feet. Also, we did secured the top of all the base cabinets to the wall with either screws or wall anchors.
Thanks for the tip about the beeswax - it sounds sticky though :) . Waterlox has also been suggested to us. So far, we've just continued using the IKEA oil. We have really enjoyed the countertops.
your Kitchen cabinets looks good and I am also thinking to install new one in my kitchen. Please share more new photos of your kitchen cabinets. I am eager to see that.
Fitted kitchen
Your Kitchen cabinets are just beautiful, cute and lovable!!What are the necessary things to complete our Kitchen cabinets.
Ready to assemble cabinets
Thanks for the tips. I guess both of these options are likely to cost less than replacing entire kitchen cabinets.
- kitchens long island
I truly appreciate the content of your blog.. Keep going.
Custom cabinets oklahoma city
Post a Comment